How Many Decimal Digits for Storing Longitude & Latitude?

This was always a topic of interest that most people are not aware of. I read this blog and I wanted to share as well. Find below the picture that shows the differences based on the decimal precision. It is aplied for a location in Germany but it gives a good idea of the decimals to be applied in “European” latitude. The image was created in this blogpost.

Skouries mine & Seismic Activity

As a continuation of the previous post I created the a map which compares the Skouries mine in Chalkidiki with the Seismic activity on the region.

The mine was digitised using satellite imagery in QGIS. The data sources are explained in the previous post. The map was created both in QGIS (picture above) and in ArcGIS Online (in this Link).

Creating an ArcGIS Online map using Seismic data

Intro

For quite long time I wanted to combine seismic data and produce a map for the Greek region. Last week I had the opportunity to work on it and I will explain the steps I followed bellow.

In order for you to be able to create this map you should create an ArcGIS Online (AGOL) account in this link.

Data

The data used in this map were downloaded from two different resources. The first data set was the Earthquakes data and they were downloaded from the Faculty of Geology of the National and Kapodistrian University of Athens and the data portal that they provide.

It is possible to select the desired parameters and download the file in .csv format. I selected to have earthquakes with a magnitude greater than 4 (Richter magnitude scale) and depth of 0-200km. The region was left as the default.

The second dataset used was downloaded from the Greek Database of Seismogenic Sources, which is a repository of geological, tectonic and active-fault data for the Greek territory and its surroundings. The dataset includes composite and individual seismogenic sources. Unfortunately the dataset hasn’t been updated for the last 5 years, but it gives a very good indication of the Seismic sources in the region.

The later dataset was in .kmz format which I converted to GeoJSON in this converting website. Easy to use and multi-format availability.

ArcGIS Online

There is this very nice tutorial on how to upload data to AGOL and it explains in detail on the section “Add the CSV file as a layer” how to do so with a .csv file. Same procedure can be followed for a GeoJSON file.

Overview of the Greek Region

I used the ESRI topographic map as a basemap. The symbology of the earthquakes is based on the magnitude (size) and depth (colour) attributes.

The map can be found in this link.

The overview might be a bit hectic for the untrained eye, but as you zoom in to specific regions you can see the details and check all the attributes by clicking to all the Features.

Details of a smaller region with Pop-up

GIS web app using Node.js, MongoDB and Leaflet

Intro

Since a few months ago I wanted to explore the possibilities of Node.js and how can it be used and applied to a Web-GIS application using Leaflet. What if we combine this with a NoSQL database like MongoDB?

Initial searches on the web didn’t reveal too much in the way that Leaflet, Node.js and MongoDB are combined fast and successfully. There are only a few examples and I focused mostly on this one (thank you John!). I wanted to create an example that will be really fast on implementation and easy to use.

Details

This example can be found in this Github link.

My suggestion is to use an IDE of your preference (like ATOM) to work with it. Also my suggestion is to follow the Create-Manually guide on the same Github and create the example yourself. It should not take you more than 3-4 hours!!! Obviously this is not the ideal end result for a web app, but it is definitely a good starting point!

I will not get into details about the installations since you can find several resources out there with very precise and detailed descriptions. In order to build a Node.js application you will need to install Node.js as described on the nodejs.org website. With this installation you should be able to access the npm package manager which will be used extensively.

The example as given on the Github is using the train stations in The Netherlands as sample-data. So, at the end you should be able to produce a map which will have the stations.

This is the end result of the app created

Good luck on it and contact me in case something will not work!

ArcMap vs. ArcGIS Pro

In this post I will compare the two ArcGIS Desktop applications: ArcMap & ArcGIS Pro. There is a big discussion around this for the last 2-3 years, so I will try to give a comparison matrix to be very fast and straightforward.

The most important comment I believe is that according to ESRI documentation, ArcGIS Pro will eventually replace ArcMap. ESRI will continue to support and maintain ArcMap. There are still some capabilities of ArcMap that are not yet in ArcGIS Pro, so some ArcGIS Desktop users will be using both ArcGIS Pro and ArcMap till Pro has everything you need to fully support your work. 

While Esri has moved most of its development efforts to ArcGIS Pro, ESRI will continue to provide support and minor bug fixes in ArcMap for a long time (you can find the ArcMap Product Life Cycle on the Esri website).

Comparison Matrix

FUTURE IN ARCGIS DESKTOP TECHNOLOGY

It is worth it to spend some time and read the Esri User Conference 2018 Q&A (check here). Find below what it is mentioned in the sub-section titled as “What is the future of the ArcGIS Desktop technology?

[…] Over the last several years, we have been migrating the capabilities of ArcMap into ArcGIS Pro, and with the recent 2.2 release, most of the commonly used capabilities have been implemented in ArcGIS Pro. Over the next year, we expect ArcGIS Pro to provide virtually all the commonly used capabilities found in ArcMap.

[…] ArcGIS Pro represents a major enhancement in capabilities for our users because it is fully integrated into the ArcGIS platform and the Web GIS pattern of working on and with web layers, web maps, and web scenes. This means that in common workflows where a user generates a high-quality map or 3D visualization, he or she can author a 2D or 3D map and share it to ArcGIS Online or ArcGIS Enterprise to make it immediately available as web maps for other users in their organization. 

ArcGIS Pro also has a new and modern user interface, 2D and 3D views, multi-threaded geoprocessing, support for multiple layouts, and many of the features and functions requested by users for many years. ArcGIS Pro can also be easily virtualized in cloud environments. Currently, over 12% of ArcGIS Pro users have deployed it in this manner. Esri is working on new innovations in ArcGIS Pro in the “connected desktop” and the services architecture, including many apps that complement and extend the desktop environment and capabilities of our users.

File GeoDatabase to PostgreSQL (PostGIS)

GDAL, amongst other programs includes the ogr2ogr. The ogr2ogr program can be used to convert simple features data between file formats performing various operations during the process such as spatial or attribute selections, reducing the set of attributes, setting the output coordinate system or even reprojecting the features during translation.

In case you have Windows, you need to use the CMD to use ogr2ogr. In case of MAC or Linux you can run it via the terminal. Normally, if you have QGIS, you should already have ogr2ogr (you can assess this typing ogr2ogr in CMD terminal). Find more details on the ogr2ogr in the gdal documentation.

In this blog post we will use the ogr2ogr in order to import a File GeoDatabase (FGDB) into a PostgreSQL database.

Feature Classes Check

The first step is to check the status of the FGDB and see which Feature Classes are included. You can do this using the ogrinfo as per below:

ogrinfo geodbname.gdb

If everything installed correctly you should be able to see all the Feature Classes in the GeoDB, even if they are within and Feature Dataaset. More info on the ogrinf in the gdal documentation.

FGDB Import in the GeoDB

ogr2ogr -f "PostgreSQL" PG:"host=localhost port=5432 dbname=<<DB_NAME>> user=<<USERNAME>>" geodbname.gdb -overwrite -progress --config PG_USE_COPY YES

Since you already have checked the access to the .gdb, in case you get any error, most likely something is wrong on the GDAL installation. Check the type of error and act accordingly.

The ogr2ogr program imports all the feature classes in the geodatabase if it used as above. This includes classes within the Feature Datasets. It saves them under the public schema of the defined database.

JMeter Generate report

In the previous post, we went through basic steps on how to create a simple JMeter performance test for an ArcGIS Server Map Service. In this post I will explain how to to use the JMeter dashboard generator, in order to visualise the results.

JMeter supports dashboard report generation to get graphs and statistics from a test plan (JMeter documentation). The JMeter dashboard generator is a modular extension of JMeter. Its default behaviour is to read and process samples from CSV files to generate HTML files containing graph views. It can generate the report at end of a load test or on demand.

Configuration

By default the you are able to generate a dashboard report in JMeter. If not, Check if your JMeter configuration in jmeter.properties file under JMETER_HOME/bin directory, follows these settings:

jmeter.save.saveservice.bytes=true
# Only available with HttpClient4
#jmeter.save.saveservice.sent_bytes=true
jmeter.save.saveservice.label=true
jmeter.save.saveservice.latency=true
jmeter.save.saveservice.response_code=true
jmeter.save.saveservice.response_message=true
jmeter.save.saveservice.successful=true
jmeter.save.saveservice.thread_counts=true
jmeter.save.saveservice.thread_name=true
jmeter.save.saveservice.time=true
jmeter.save.saveservice.connect_time=true
jmeter.save.saveservice.assertion_results_failure_message=true
# the timestamp format must include the time and should include the date.
# For example the default, which is milliseconds since the epoch: 
jmeter.save.saveservice.timestamp_format=ms

Report Generation

You can combine the report generation with the jmeter command of running the test or you can run them separately. While learning how to use the generate report module, I suggest to I run the generate report command separately. But I will detail both of them.

All at once

You can run them all at once using the following command:

jmeter -n -t [path to test JMX file] -l [path to test result file] -e -o [Path to output folder]

In this way you cover all the JMeter functionality as required in the ArcGIS Server performance testing. It is a very useful tool to automate the procedure but not for starters.

From an existing sample CSV/JTL result

If you followed the previous post correctly you should have a .csv file created at the end of the test. You can use this file to generate the report with the use of the Generate report module of JMeter, as follows:

jmeter -g [path to result file] -o [path to report output folder]

In my case were the file was named Performance test.csv I used the following command:

jmeter -g /<<PATH>>/"Performance test.csv" -o /<<PATH>>/HTML_Reports

Please note the “” on the file name. Also, at the end of the created file I added the “HTML_Reports” which is a folder created to save all the required files within.

Report

You can now navigate to the folder you defined and check the results. If you open the “index.html” you will see directly the report.

Details on the tables and figures created can be found on the JMeter documentation. Another detailed documentation is this one.

Report Configuration

As you can see the report is nothing but an HTML file including css, js and pages. Obviously this is highly configurable as a result but also in the basis of the creation of the file. More details on the jmetervn post.

Apache JMeter for ArcGIS Server as a performance testing tool

This is a simple step-by-step tutorial on how to setup the JMeter as a performance testing tool for an ArcGIS Server Map service and then use it. We will create a really simple test project, where we will run several identical requests based on the actual request that our application uses. When we will be done with that, we will use the JMeter Generate report to visualise the results of our test fast and (really) easy. This last step however, will happen in the next post.

I worked based on the Alex Tereshenkov blogpost about JMeter but with several amendments. The amendments were necessary because I am not interested on testing the SampleWorldCities map service and also want to get data back and not the image of the map back. If you are interested on working in Jmeter on detail, spend some time on the great blog post from Esri about the JMeter.

Installation:

First step is to install the the latest Java (64bit JRE or JDK) in your workstation. Depending on your OS there are different ways to do so. For MAC user I suggest to use Homebrew and then follow the instructions on this link or this link.

The next step is to install the JMeter. The manual way is to download the binary from the official website, move this file to your preferred location, extract it and use the bin directory files. My preferred method (for MAC users) is to use Homebrew (once again):

brew install jmeter

Or if you need plugins also:

brew install jmeter --with-plugins

And to open the application, use the following command:

open /usr/local/bin/jmeter

Or you can directly run JMeter on the same terminal:

jmeter

Test Preparations

When you open the JMeter you will get the bellow screen. In my case, the GUI colours are amended to dark, so ignore the colour style of the software. If you would like to change the theme, you can always switch through the ‘Options->Look and Feel’ menu.

First screen

The first thing to do is to amend the name of the test plan. Use a name that makes sense for the test you are going to perform, like “PerformanceTest”. Then right-click on the name and Add>Threads(Users)>Thread Group.

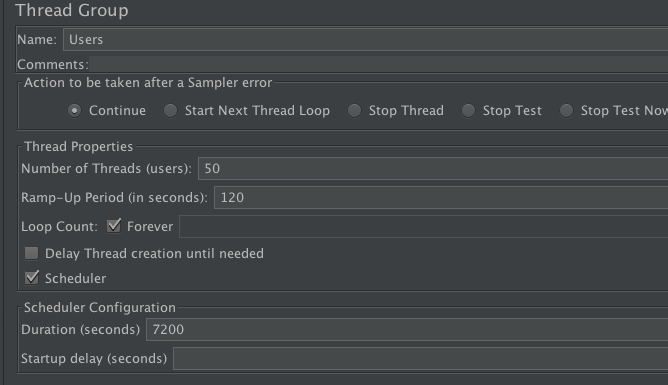
The Thread Group is the group of users that you are going to use in order to test. In this Group you can define their behaviour. Use the details as detailed below. We are using 50 users, which are building up to the full number of 50 in 2 minutes (120sec). We define that if an error occurs the test should continue. Also the test will be finalised based on a time trigger and not on specific loop count.

  • Action to be taken after a Sampler error: Continue
  • Number of Threads (users): 50
  • Ramp-Up Period (in seconds): 120
  • Loop Count: Forever
  • Scheduler is used with Duration (seconds): 7200

Thread Group

Thread Group Configuration

The next step is to include the HTTP request by Right-Click on the Users>Add>Sampler>HTTP Request. In the HTTP Request you define the details of the GET call you want to test/perform on the service. The best way to define the call is to open your application and check the actual GET call that is used. In this way you will have precise results on the GET call used. If there are multiple call you can use multiple HTTP Requests. The details defined are:

  • Protocol: https (it could be http)
  • Server Name or IP: <<SERVER NAME>> (ex. sampleserver6.arcgisonline.com)
  • Port Number: <<PORT NUMBER>>
  • Method: GET (it could also be POST method, but this is not explained here)
  • Path: <<GET CALL>> (ex. arcgis/rest/services/sensors/MapServer/0/query?f=json&resultOffset=0&resultRecordCount=1000&
    where=1%3D1&
    outFields=ESRI_OID%2CTIME%2CVALUE&
    outSR=4326&
    spatialRel=esriSpatialRelIntersects
  • Parameters (only if token required):
    • Name: token
    • Value:<<TOKEN Value>>
    • Include Equals: Check

Please note that in case login is required on the ArcGIS Server, you will need to have a generated token as explained in the ESRI documentation.

In this step the test is ready but it is very important to create some listeners, which will be the “direct feedback” to us. We need the listeners to understand how the test goes in real-time. The below listeners are just a few listeners that I find very convenient and helpful to use. I highly recommend you to use them all and try to find you ideal combination. So, add a listener by Right-Click on the HTTP Request>Add>Listener. The listeners I am using are:

  • View Results Tree: I use this to check directly the result and Request/Response data. As you can see in the image below the green icon gives you an instant feedback that the Request/Response is successful with details on the timings etc. Also, you can check the exact message on the Request or Response Data tab.
  • Summary Report: A single line which gives you an overview of the test.
  • Response Time Graph: Very useful listener in order to check the response times throughout the test. There are many options to be amended in case you want a “fancy” result. I am just setting the Interval (in ms) to the appropriate number and check the view. For example in a 2 hrs test a resonable interval is the 10000ms (10 sec). Please note that the time graph does not automatically refresh.
  • Simple Data Writer: This listener records details in a file (.xml or .jtl or .csv) , based on the configuration as you define. In case you want to use the Generate report functionality, the configuration should be left as default! Of course you can set multiple listeners and check in different formats and types.


Running the test

Whenever you are ready press the Start Button. You can instantly check the View Results Tree if it works and fix this in case it doesn’t. The Response Time Graph will give a good idea of how the ArcGIS Server performs in real time.

If something is not working, you can always re-run the test. This might happen a lot during set-up of the test. Use the Reset Search Button and the Clear All Button on top to clean the results and re-run.

You can run the test without opening the GUI. Several websites explain this process like this one. This is very helpful when you want to automate the testing procedure. Just navigate to your project folder and use:

jmeter -n -t "<<FILE NAME>>.jmx"

Please note that if you copy-paste the terminal might not encode the correct character and you get an error as explained here. So, type the command.

On this next post we will use the JMeter Generate report to visualise the results of our test. Have fun!

ArcGIS REST API query tips for beginners

Lately I checked gis.stackexchange and there are several easy questions regarding ArcGIS REST API and how to query it. I would like to share a few simple tips in order to do so. Details on the query operation functionality on the ESRI documentation.

First of all I find very helpful the Chrome extension “Map Services Enhanced”. It is an amazing tool that can help even advanced users/developers to understand the status of an ArcGIS REST Service.

An extension for analyzing, interrogating, and troubleshooting ArcGIS REST Services. This extension works with ArcGIS Server REST pages to collect and present additional data related to the services you are seeing. You can search for relevant data, and find the corresponding map service. It also reviews data from links to services

Besides the obvious help of the details in the HTML interface of the REST API, it gives a Query Helper on the Query operation of the service.

Lets use an example in this post to make it easier to experiment. The example can be this, an open service by ESRI. If you open the link and you have installed the Map Services Enhanced extension, you will see that there are 134 (at this moment) features. You can click the Query operation in the lowest point of the website.

The absolute tip for a beginner when he first opens the Query page of a service is to  add in the Where: field the value 1=1. In this way you will get all the records but not all the attributes. It is a good way to have an overview. PLEASE NOTE that if the service has a lot of records, this query will delay a lot and possibly could cause some issues on the server.

If you want to have all the available fields as an output you can add in the Output Fields: the * value. In this way you will have a very good overview of the service and you can easily adjust the query to reflect your needs. For example instead of setting 1=1, we can select all the records Where:DAY=’SUN’ which will return all the records where the day is set as Sunday.

The Query Helper can really assist you on that. For example if you didn’t check the amount of Features in the previous webpage, you can press the Get CountOnly *. In this way you will just get the number of the available records.

Those were just some very simple tips. You can dig into the ESRI documentation to get more details on the functionality, but I would suggest you to work on the Query operation and try to find out yourself the possibilities of the tool.

In a latter post I will give more details, especially on the way that you can automate the query operation as a Python procedure.


ArcSDE licensing

I was really curious about the ArcSDE licensing and tried to find some information in the internet about it. In my opinion it is very weird that the Enterprise GeoDB creation requires keycodes (Authorisation file) from ArcGIS Server  software and that there should be another way to do so. But after digging and surfing, there is not much information about that topic.

On this gis.stackexchange Question (answered on August of 2015) it is mentioned that:

“Esri incorporated ArcSDE into ArcGIS Server with the release of ArcGIS 9.2. In order to deploy ArcSDE technology as an enterprise geodatabase you must have, or be prepared to purchase, an ArcGIS Server license. Since the introduction of ArcGIS 10.0, the actual enterprise geodatabase installer lives within ArcPy, and can be invoked either as an ArcToolbox tool or directly from Python.”

Checkin on the Create Enterprise Geodatabase tool documentation for the authorization_file option, it is explained as:

“Provide the path and file name of the keycodes file that was created when you authorized ArcGIS Server. If you have not already done so, authorize ArcGIS Server to create this file.”

Also, in this GeoNet post (from 2011), it is mentioned that:

“You cannot purchase a license for ArcSDE. Since 9.2, the ArcSDE application server is a *part* of the Enterprise ArcGIS license.”

Finally, in this ESRI community post, it is explained on details what to do with the authorisation file (in case you miss it) and it notes that:

“NOTE: You must have authorized ArcGIS Server to create the keycodes file ahead of time!”

So, it is clear that there is no separate installation any more for ArcSDE and that this could be done via ArcGIS Desktop software (ArcMap or ArcGIS Pro). Nevertheless it is required to have ArcGIS Server licence in order to be able to create an Enterprise Geodatabase.